![]()
|
|
|
| 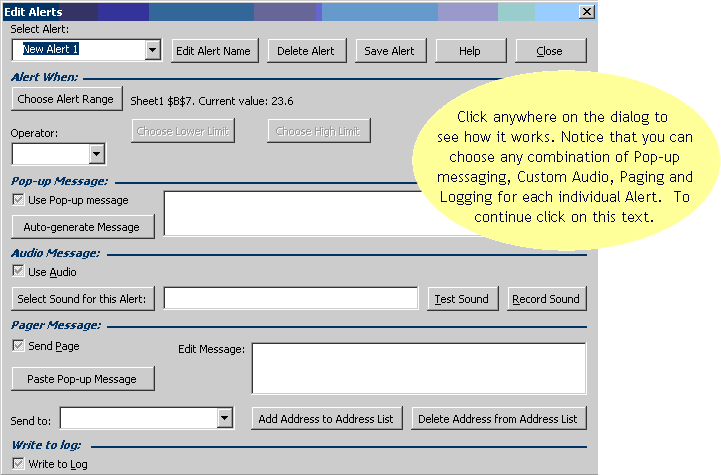 When you click on the "Edit Alert Name"-button, you can change the name of the currently displayed alert. Back When you click "Delete Alert", you will be asked whether you want to delete the currently displayed alert. Back When you click "Save Alert", the changes you made to the current alert will be saved to the workbook and the workbook will be saved to disk. Back When you click on the "Close"-button, the alert setup dialog closes. If any changes to the current alert have not been saved yet, you will be prompted to do so. Back When you click on the "Help"-button this page of the help file will be activated. Back The "Select Alert"-box allows you to view and select existing alerts from the list. When you select one, the dialog will display the current alert profile for editing. Back When you click on "Choose Alert Range", you can select a cell that contains the value necessary to trigger your alert. You can choose an operator (=, <>, <, <=, >, >=, between, not between) from the "Operator" box. Depending on this choice you can "Choose Lower Limit" range or value and/or "Choose High Limit" range or value. Back In the remainder of the dialog you will find four sections, each of which has an associated check box in the Edit Alert Options Dialog. Back The pop-up messaging section allows you to create and/or edit custom alert messages which will be displayed as a pop-up when the alert runs and a critical value has been exceeded. The "Use Pop-up Messaging" checkbox determines whether or not pop-up messages are part of an individual alert. Back You may choose to use the "Auto Generate Message" feature. This feature automatically generates a pop up message utilizing your selected alert name and the criteria you specified for your alert cell, which you can then edit as you like. If you don't specify anything in the "Edit Message" box, a standard message will still be displayed telling you: "The current alert value for (alert name) is (value)." Back The "Use Audio"-checkbox will cause a sound to be played when the alert goes off provided that the global settings are set to use audio alerts. The Audio section has a "Select Sound for this Alert"-button that allows you to choose a sound from your sound library, or from the "windows/media" directory as you see fit. The sound file path and filename of the sound you select will be displayed in the textbox next to this button. The "Test Sound"-button will play the sound specified in the textbox. The "Record Sound"-button will activate the sound recorder so you can record your own custom alert message, which you can save and subsequently select as the sound for this alert. Back The paging section allows you to send a message to an E-mail address, which can be an address on a paging server. If that is the case, the carrier of the pager will receive the message when the alert goes off. The "Send Page" checkbox determines whether paging is part of an individual alert. You can paste the pop-up message and/or edit a message to your liking. In the "Send To:" box you can enter or select an E-mail address to send the message to. E-mail addresses can be added to the address list which is stored in the active workbook by clicking on the "Add Address to Address List" button. The "Delete Address from Address List" button will (after confirmation) delete the currently displayed address from the address list. To remove the E-mail address from the current alert, you can simply clear the "Send to" box. Back
|
|