|
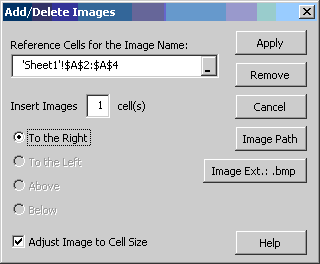
Add/Delete
Images Dialog

Reference
Cells for the Image Name:
The contents of the cells
specified in this box will be the file names of the images without
extension (.bmp, jpg, gif, wmf).
(back to dialog)
Insert
Images
In this text box you enter the
offset (distance) between the cell in the selection, and the cell where
the image will be inserted.
(back to dialog)
To
the Right, to the Left, Above, Below
Depending on where your selection
is in the workbook, you can insert the images in different directions.
If your selection is in column A, you can of course not insert the
images to the left.
(back to dialog)
Adjust
Image to Cell Size
By default the images will be
adjusted to the cell size, but you can deselect this option to keep the
inserted images in the original size. The ratio height/width will remain
the same.
(back to dialog)
Apply
This will insert the images. based
on the selection in the range box and the rest of the dialog.
(back to dialog)
Remove
This will remove the images based
on the selection in the range box.
(back to dialog)
Cancel
This will close the dialog.
(back to dialog)
Image Path
This button will allow you to
select a new image path. When you hover over the button with the mouse,
the current path will be visible as a tag. When you insert images, the
first level of subdirectories will also be searched. For example: when
you search in "My Pictures", and you have a subdirectory named
"My Special Pictures", the add-in will search that directory
too.
(back to dialog)
Image Ext.
If you enter an extension here,
only files of that extension will be used. If you donít enter an
extension, files will be searched in the order .bmp, .gif, .jpg, .wmf
until the image is found.
(back to dialog)
Help
Activates this page of the help
file.
(back to dialog)
|