When you
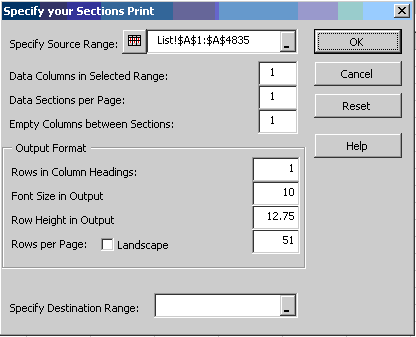
choose Print Sections, you will get this dialog:

This function helps you make printouts with multiple sections on one page. When you select this option Excel will make a copy of the sheet you want to print. The Print Sections Macro will be applied to the copy, not to the original. If you don't like the result, you can easily undo it by deleting the sheet with the unwanted formatting and try it again. The dialog contains the following controls:
Specify Source Range
This range box, in combination with the "select current region" button
( ) allows you to quickly select the entire range that you want to reformat for printing in multiple sections. ) allows you to quickly select the entire range that you want to reformat for printing in multiple sections.
Data Columns in selected range
This is the number of columns containing data for your print. Typically Spinnaker Prints suggests the correct number, you can specify more or less if you want to.
Data Sections per Page
Lets you specify how many sections of columns you want per page.
Empty Columns between Sections
You can specify to have zero columns between your sections, but usually you will choose one.
Rows in Column Headings
Sometimes a data file uses more than one row for the field names. You can specify how many rows this file uses for the Column Headings. The default is one.
Font Size in Output
When you specify a font size in this box, the row height will be set at 1.275 times the font size, and the rows per page will be calculated.
Row Height in Output
When you adjust this value, the number of rows per page of output will be recalculated.
Landscape
This checkbox will set the output to landscape, and recalculates the number of rows per page of output.
Rows per Page
This box displays how many rows will be fitted to one page. Though you can change this manually, increasing this number will increase the risk that your pages get messed up.
Specify Destination Range
If you specify a Destination Range, the output will be generated below, and to the right of the first cell in that range. If you donít specify a Destination Range, a new sheet will be inserted, and the output will start in cell A1.
Help
This button activates this help file in the context of "Spinnaker
Sections Prints".
OK
This will generate the print output according to the specifications of this dialog and display the resulting layout in print preview. If it turns out that not all data fits on the page as intended, you can choose to either redo it and specify less rows per page as needed, or you can go into page setup and adjust the scaling to something like 95%.
Cancel
This will cancel the print. It will also eliminate the copy of your data that was made to generate the Sections Print.
(back to dialog)
|